
Week 12: Algorithms and efficiency#
Important
First, download_week12.py and run the script in VSCode.
You may need to confirm the download in your browser.
The script should end with Successfully completed!. If you encounter an error, follow the instructions in the error message. If needed, you can proceed with the exercises and seek assistance from a TA later.
Exercise 12.1: CPR number#
Exercise 12.1: CPR number
Have you ever wondered how websites know if the CPR number you gave them is valid or not? In this exercise, you will find out how to do this yourself!
What many people may not know is that the last digit of the CPR number is a check digit, which is calculated from the first nine digits. This check exists to ensure the validity of a CPR number.
Note
The CPR number is a personal identification number used in Denmark for several purposes, including tax, health care, and social security. It consists of your birthday (DDMMYY) and four digits, where the last is even for females and odd for males.
Let’s say you are given the CPR number 1111111111 and want to know if it is valid.
Multiply the first nine digits by the corresponding value from the “control number” 432765432, and add everything together. In our example, since the first nine digits of the CPR number are
111111111, this should sum up to
Calculate the remainder of the previous result by division with 11. In our case, this is the remainder of the division \(36/11\), which is 3 since \(36= 3\cdot11 + 3\)
Subtract the remainder from 11 to get the final CPR digit (the check digit). In our case that would be check digit = \(11 - 3 = 8\)
The final digit of the CPR should therefore be \(8\). So the correct CPR number should be
1111111118. Since this calculated last digit is different from 1,1111111111is not a valid CPR number. That’s it!
The goal of this exercise is to check if a given CPR number is valid or not. You should write a function cpr_check() that takes a string of a full CPR number as input and returns a boolean value indicating whether the CPR number is valid or not.
Start by implementing an algorithm to calculate the check digit and then compare it to the last digit of the CPR number. If they are the same, the CPR number is valid. Otherwise, it is not.
Add your function to the file cp/ex12/cpr_check.py to be able to run the tests.
>>> cpr_check('1111111111')
False
>>> cpr_check('1111111118')
True
- cp.ex12.cpr_check.cpr_check(cpr)#
Check if CPR number is valid based on check digit.
- Parameters
cpr (
str) – CPR number as str.- Return type
bool- Returns
Boolean whether CPR is valid or not.
Exercise 12.2: Polygon - Initializer#
Exercise 12.2: Polygon - Initializer
Over the next few exercises you will build a class, that represents a Polygon (a shape with any number of corners and straight edges), and add various methods to it.
In this first exercise, you should implement the constructor (__init__) method of this class.
The constructor should take a list of tuples where each tuple contains the \(x, y\) coordinates of the corners of the polygon. They should be converted to numpy arrays of the \(x\)- and \(y\)-coordinates of the corners of the polygon, and stored in attributes x and y of the class.
Here is an example of how the class is used:
>>> points = [(24, 12), (40, 16), (36, 8), (44, 4), (28, 0), (18, 4), (12, 0), (0,4), (8, 12), (4, 16)]
>>> P = Polygon(points)
>>> P.x
array([24, 40, 36, 44, 28, 18, 12,  0,  8,  4])
>>> P.y
array([12, 16,  8,  4,  0,  4,  0,  4, 12, 16])
Add your function to the file cp/ex12/polygon.py to be able to run the tests.
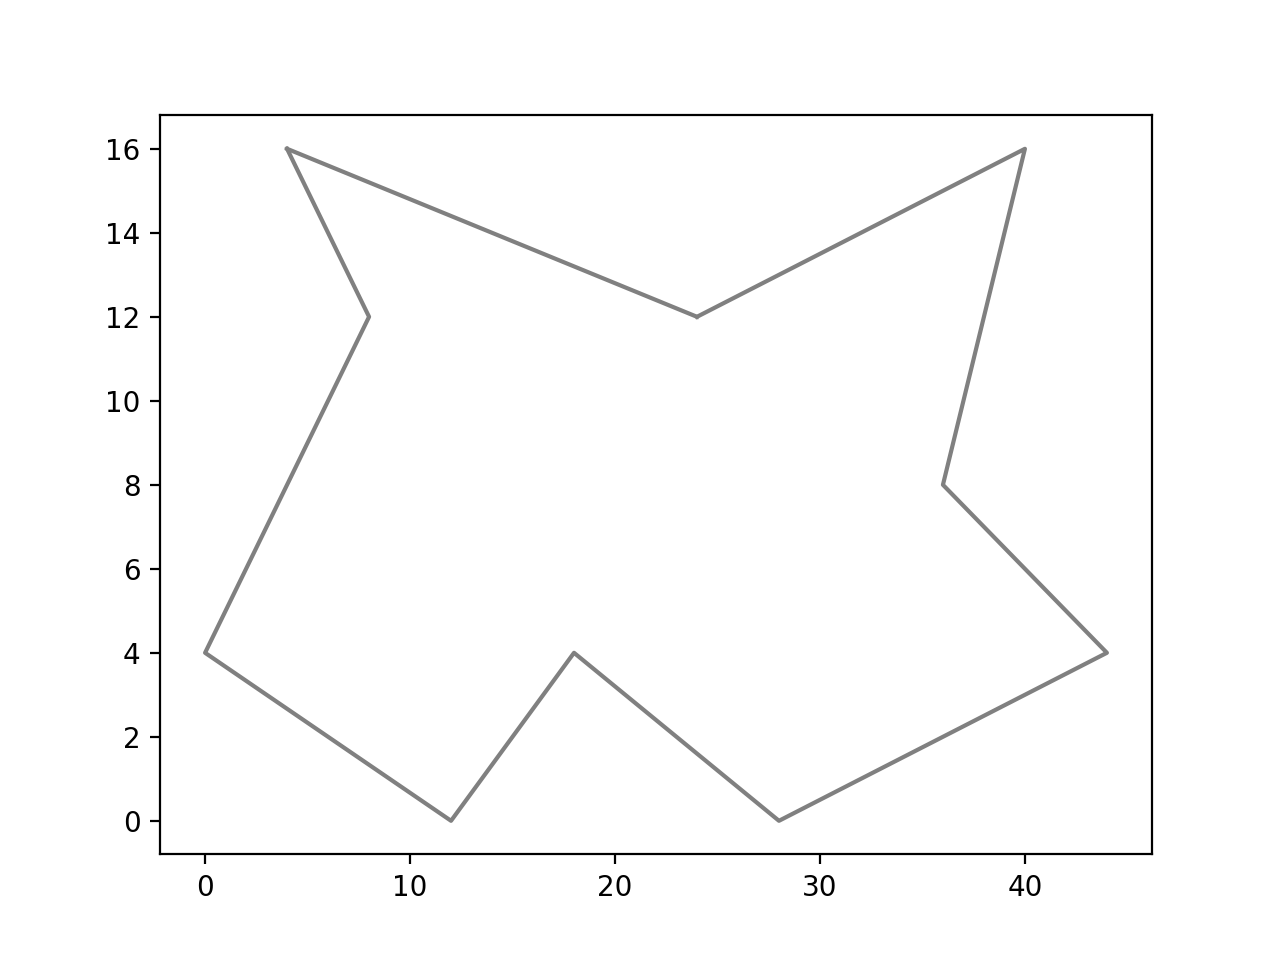
Exercise 12.3: Polygon - Plot#
Exercise 12.3: Polygon - Plot
We will now expand on the Polygon class by including a plot_polygon method for the class we built in the previous exercise.
The goal of this method is to make a plot of the polygon object, where all ends of the polygon are connected.
In addition to connecting should connect each point i to the next poiint i+1,
you should also connect the first point to the last one.
Have a look at the following example to see how this could look:
P = Polygon([(24, 12), (40, 16), (36, 8), (44, 4), (28, 0), (18, 4), (12, 0), (0,4), (8, 12), (4, 16)])
P.plot_polygon()
(Source code, png, hires.png, pdf)

Add your function to the file cp/ex12/polygon.py. There are no tests for this exercise, but try it out yourself and check that it works as expected. You should have a fully connected polygon like in the example above.
- class cp.ex12.polygon.Polygon(points)
A class to represent a polygon.
- plot_polygon()
Plot the polygon.
Exercise 12.4: Polygon - Area#
Exercise 12.4: Polygon - Area
For this exercise, we will further expand the Polygon class.
You should now create a get_area method that calculates and returns the total area of the polygon.
The area of a polygon can be calculated using the shoelace formula. The shoelace formula for the area is:
\[\begin{split}\begin{align} 2*A &= (x_1*y_2 + x_2*y_3 + ... + x_{n-1}*y_n + x_n*y_1) \\ &- (x_2*y_1 + x_3*y_2 + ... + x_n*y_{n-1} + x_1*y_n) \end{align}\end{split}\]
Don’t forget to include the last term of each parenthesis!
Note
There are several ways you can implement this, but try to do it vectorized.
use
np.roll(doc) to shift a list by one element and then use vectorized operations (np.dot) to calculate the area
Try both options and see which one you like best! Which one is more efficient?
Your function should return the absolute value of the area in the output, as the user may provide the coordinates in either a clockwise or a counterclockwise order. This ensures that the returned area is always a positive number.
You should be able to use the new class as follows:
>>> P = Polygon([(24, 12), (40, 16), (36, 8), (44, 4), (28, 0), (18, 4), (12, 0), (0,4), (8, 12), (4, 16)])
>>> P.get_area()
424.0
Add your function to the file cp/ex12/polygon.py to be able to run the tests.
- class cp.ex12.polygon.Polygon(points)
A class to represent a polygon.
- get_area()
Get the area of the polygon.
- Return type
float- Returns
The area of the polygon
Exercise 12.5: Polygon - Perimeter#
For this exercise, we will again expand the Polygon class to now also include a get_perimeter method that calculates and returns the perimeter of the polygon.
The perimeter of a polygon object is the sum of all the lengths of the sides of the polygons which can be calculated as the sum of
\(d_{i,i+1}\) where \(d_{i,i+1}\) is the distance between point \(i\) and \(i+1\) and defined by:
Again remember, to also include the edge from the last to the first point. Try to use np.roll to make the calculation easier.
>>> P = Polygon([(24, 12), (40, 16), (36, 8), (44, 4), (28, 0), (18, 4), (12, 0), (0,4), (8, 12), (4, 16)])
>>> P.get_perimeter()
118.87057243365838
Add your function to the file cp/ex12/polygon.py to be able to run the tests.
- class cp.ex12.polygon.Polygon(points)
A class to represent a polygon.
- get_perimeter()
Get the perimeter of the polygon.
- Return type
float- Returns
The perimeter of the polygon
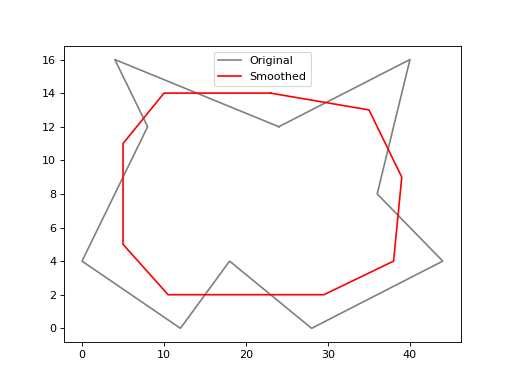
Exercise 12.6: Polygon - Smooth#
Now, let us dive into the last exercise for this course. A clap to you for hanging on with the exercises for 12 weeks!
In this exercise, your goal is to apply a smoothing operation to a polygon. Your task is to update the x and y lists within the polygon object with new values. These new values are determined by the following equations:
This formula holds true for \(i=2,...,n-1\). For the first and the last point, one has:
In these equations, the updated \(x\) and \(y\) points of the curve are determined by an adjustment towards the midpoint between their two neighboring points. The amount of adjustment is controlled by the parameter \(\alpha\), typically ranging between 0 and 1.
When \(\alpha=0\), no change is applied to the points
When \(\alpha=1\), the points are moved to the average of their neighbors.
Your task is to add a smooth_polygon() method to the Polygon class. This method should calculate the smoothed polygon coordinates based on the given equations and overwrite the original coordinates.
Tip
When implementing the code for this exercise, use the np.roll() command to implement the smoothing in a few lines of code. You shouldn’t you need extra cases for the first and last point when using np.roll().
This is what a smoothed polygon should look like:
P = Polygon([(24, 12), (40, 16), (36, 8), (44, 4), (28, 0), (18, 4), (12, 0), (0,4), (8, 12), (4, 16)])
P.plot_polygon()
P.smooth_polygon(0.5)
P.plot_polygon()
(Source code, png, hires.png, pdf)

Add your function to the file cp/ex12/polygon.py to be able to run the tests.
- class cp.ex12.polygon.Polygon(points)
A class to represent a polygon.
- smooth_polygon(alpha)
Smooth the polygon.
- Parameters
alpha (
float) – The smoothing parameter
Optional Exercise: zip and enumerate#
Exercise 12.x: Zip and enumerate
The zip function in Python is a handy tool for iterating over multiple iterables simultaneously.
Try to solve the following exercise using zip and enumerate. Look up these functions online to get an understanding of how they work.
You are given a list of names and a list of ages. Create a list containing tuples with the name and age of each person.
Now you want to print for each person:
<name> is <age> years old. Try doing this without indexing the lists directly.Add a number to each person:
<number>. <name> is <age> years old. (Tip: useenumerateand start at 1)
Solution
>>> names = ['Alice', 'Bob', 'Charlie', 'Diana']
>>> ages = [23, 45, 17, 32]
>>> for i, (name, age) in enumerate(zip(names, ages), 1):
...   print(f'{i}. {name} is {age} years old')
...
1. Alice is 23 years old
2. Bob is 45 years old
3. Charlie is 17 years old
4. Diana is 32 years old
Optional Exercise: List Comprehension#
Exercise 12.x: List Comprehension
Another very powerful tool is list comprehension. List comprehension offers a shorter syntax when you want to create a new list based on the values of an existing list. Solve these exercises using list comprehensions. Each solution should be only one line, exluding the definition of the input list.
You are given a list of numbers. Create a new list containing the squares of the numbers.
You are given a list of strings. Create a new list containing the lengths of the strings.
You are given a list of strings. Create a new list containing the lengths of the strings, but only if the string is longer than 5 characters.
Solution 1
>>> numbers = [1, 2, 3, 4, 5]
>>> [x**2 for x in numbers]
[1, 4, 9, 16, 25]
Solution 2
>>> strings = ['a', 'ab', 'abc', 'abcd', 'abcde', 'abcdef']
>>> [len(s) for s in strings]
[1, 2, 3, 4, 5, 6]
Solution 3
>>> strings = ['a', 'ab', 'abc', 'abcd', 'abcde', 'abcdef']
>>> [len(s) for s in strings if len(s) > 5]
[6]